Foundation foam injection follows systematic seven-step process: comprehensive site assessment identifying problems, strategic injection hole drilling, equipment setup and material preparation, controlled foam injection with real-time monitoring, immediate verification, hole patching, and final documentation ensuring successful repair.
Professional foundation repair requires methodical execution. Each step builds on previous work ensuring success. Polyurethane foam concrete lifting demands proven protocols and trained technicians. Understanding the complete process guides facility managers making informed decisions.
Foundation repair success depends on thorough evaluation. Comprehensive assessment reveals conditions and requirements. This critical phase guides all subsequent decisions.
Visual examination identifies obvious foundation problems and distress patterns. Experienced technicians recognize signs requiring detailed investigation. This initial survey establishes project scope.
Interior floor cracks indicate settlement locations and severity. Diagonal cracks at corners suggest differential movement. Horizontal wall cracks show structural distress. The crack patterns reveal underlying problem areas.
Inspection Checklist:
Exterior foundation examination reveals structural condition. Visible cracks confirm serious problems. Horizontal separations suggest lateral pressure issues. Vertical settlement cracks show foundation movement.
Door and window operation testing indicates frame distortion. Sticking doors signal settlement-induced movement. Gap measurements quantify distortion severity. These functional problems confirm structural issues.
Ground-penetrating radar scanning locates voids beneath foundations. The technology reveals hidden cavities invisible from surface. Void size, depth, and distribution get mapped accurately.
Soil borings extract samples revealing subgrade conditions. Laboratory testing determines bearing capacity and composition. Moisture content affects material selection. This data guides foam specification.
Investigation Methods:
Elevation surveys document current foundation conditions. Multiple benchmark points establish baseline measurements. Laser levels provide 1/16 inch accuracy. The data quantifies settlement severity objectively.
Testing results determine injection strategy and requirements. Weak soils need higher-density foam formulations. High water tables require hydrophobic products. Proper assessment prevents inappropriate material selection.
Assessment data gets translated into detailed execution plans. Proper planning ensures efficient successful completion. Multiple factors require coordination and consideration.
Testing results guide injection hole placement. Void locations determine primary injection points. Settlement patterns affect hole spacing and density. The design ensures complete treatment coverage.
Standard spacing ranges 4-6 feet for typical applications. Severe settlement may require closer 3-4 foot spacing. Light void filling allows wider 6-8 foot intervals. Customization optimizes effectiveness and economy.
Design Considerations:
Hole patterns typically follow grid layouts for uniform coverage. Perimeter-focused patterns address edge settlements. Custom approaches adapt to specific site conditions. The systematic design prevents gaps in treatment.
Drilling depth calculations account for void locations and soil profiles. Standard foundation treatments extend 12-24 inches into subgrade. Deeper problems may require 36-48 inch penetrations. Testing establishes appropriate depths.
Proper equipment positioning enables efficient operations. Material accessibility prevents delays during execution. Staging location affects project efficiency significantly.
Proportioning units require level stable platforms for operation. Electrical power connections support heating systems. Adequate space allows safe equipment access. The setup location affects all subsequent work.
Staging Requirements:
Foam component storage maintains required temperatures. Heating systems bring materials to 110-130°F optimal range. Temperature verification prevents reaction problems. Proper preparation ensures consistent foam properties.
Hose routing from equipment to injection areas gets planned carefully. Maximum lengths vary by equipment capabilities. Direct paths minimize pressure losses. The layout affects injection efficiency.
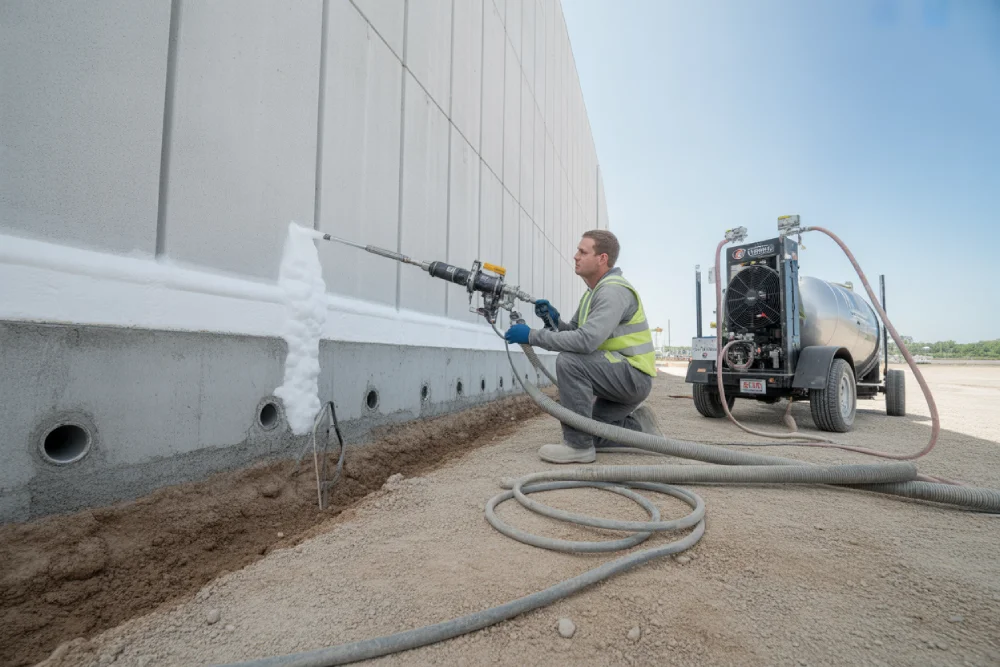
Precision drilling creates injection access without damaging foundations. Proper execution prevents problems enabling effective treatment. This phase requires skill and appropriate equipment.
Standard 5/8-inch diameter holes penetrate foundations at marked locations. Rotary hammer drills equipped with carbide bits cut cleanly. Drilling proceeds perpendicular to surfaces typically. The small holes minimize slab penetrations.
Depth control ensures proper penetration through foundation into subgrade. Depth gauges or marked drill bits prevent excessive drilling. Typical depths extend 2-4 inches below slab bottoms. This provides adequate foam placement.
Drilling Procedures:
Vacuum extraction removes concrete dust and cuttings immediately. Clean holes enable better foam flow and observation. The cleanliness also maintains site appearance. Professional contractors prioritize this step.
Reinforcement detection prevents cutting rebar when possible. Metal detectors or ground-penetrating radar locate steel. Alternative hole positions avoid reinforcement. This protects structural integrity.
Each drilled hole gets inspected before injection begins. Proper depth verification ensures adequate treatment reach. Obstructions get cleared enabling foam flow.
Compressed air blows loose debris from holes. This ensures clean pathways for foam injection. Water or mud indicating groundwater gets noted. The observations affect injection strategy.
Pre-Injection Checks:
Unusual conditions discovered during drilling get documented. Unexpected voids or very weak soils may require plan adjustments. Groundwater flow indicates moisture requiring hydrophobic foam. The information guides real-time decisions.
| Process Phase | Duration | Key Activities | Equipment Used | Critical Success Factors | Common Challenges |
| Site Assessment | 2-4 hours | Inspection, GPR, soil testing | GPR scanner, survey equipment | Thorough investigation, accurate mapping | Hidden conditions, access limitations |
| Project Planning | 1-2 hours | Pattern design, staging | Computer, planning tools | Proper hole spacing, adequate coverage | Utility conflicts, space constraints |
| Drilling | 1-3 hours | Hole creation, cleaning | Rotary hammer drill, vacuum | Accurate positioning, proper depth | Reinforcement, hard concrete |
| Equipment Setup | 30-60 min | Staging, heating, testing | Proportioner, hoses, gauges | Temperature control, system checks | Power availability, weather |
| Foam Injection | 2-6 hours | Systematic injection, monitoring | Injection gun, laser levels | Precise control, real-time adjustment | Unexpected voids, weather |
| Verification | 1-2 hours | Surveys, GPR rescan, inspection | Laser level, GPR, documentation | Confirming targets, void filling | Interpretation accuracy |
Proper equipment preparation ensures consistent foam properties. System checks prevent problems during execution. This phase establishes operational readiness.
Component heating brings materials to optimal 110-130°F temperatures. Circulation systems distribute heat evenly through tanks. Temperature monitoring confirms readiness for injection. Cold materials produce inconsistent foam.
Pressure calibration verifies accurate component delivery. Both A and B sides require precise pressure control. Imbalanced pressures cause foam defects. Gauge verification prevents mixing problems.
System Checks:
Material inventory confirms adequate supply for project. Volume calculations from planning guide ordering. Contingency amounts account for unexpected conditions. Running short requires costly re-mobilization.
Hose connections get inspected for leaks or damage. Loose fittings cause pressure losses affecting injection. Damaged hoses require immediate replacement. The thorough inspection prevents mid-project failures.
Gun operation testing ensures proper function before starting. Purge cycles clear lines of contaminated material. Test shots verify mixing and flow rates. These checks prevent wasting expensive materials.
Pressure gauge readings at gun confirm adequate delivery pressure. Comparison to proportioner gauges reveals line losses. Significant differences indicate flow restrictions requiring correction. The verification ensures proper injection.
Gun Preparation:
Air purge systems get tested maintaining open injection ports. This critical feature enables returning to previous holes. Proper purge function prevents plugged ports. The capability proves essential for precision work.
Controlled injection proceeds following established protocols. Systematic execution ensures complete treatment and precision. This critical phase determines project success.
Treatment begins at lowest elevation points where settlement is greatest. Foam injection works progressively toward higher areas. This sequence prevents material migration to already-treated zones.
Initial passes inject conservative foam quantities establishing baseline. Typical first-pass volumes range 10-20 pounds per hole. This conservative approach prevents over-lifting. Subsequent passes add material as needed.
Injection Protocol:
Multiple monitoring points track elevation changes across foundations. Laser receivers at various locations show real-time movement. All points should rise relatively evenly. Differential readings indicate localized conditions.
Operators adjust injection quantities based on observed response. Rapid rise indicates reaching target or unexpected voids. Slow response suggests dense soil or large cavities. Experience guides interpretation and decisions.
Injection gun pressure monitoring guides material placement. Pressure spikes indicate blockage or breakthrough requiring response. Steady pressure shows normal flow and expansion. The observation prevents problems.
Component temperature maintenance ensures consistent foam properties. Temperature drops during injection affect reaction rates. Monitoring confirms heat systems maintain optimal ranges. Proper temperature proves critical for quality.
Control Parameters:
Air purge between holes maintains open ports for return visits. This enables precise incremental treatment impossible otherwise. The capability distinguishes professional from amateur execution. Proper use optimizes results.
Laser level observation frequency increases during active injection. Operators watch displays continuously while injecting. Immediate response to elevation changes prevents over-lift. The vigilance ensures precision within specifications.
Continuous monitoring during injection enables precision impossible with older methods. Modern technology combined with operator skill achieves exceptional accuracy. Understanding monitoring importance explains superior results.
Rotary laser systems establish horizontal reference planes. Receivers on foundation surfaces detect elevation relative to plane. Digital displays show measurements to 1/16 inch accuracy. This precision enables exceptional control.
Multiple receiver locations provide comprehensive coverage. Large foundations require 4-6 monitoring points minimum. All areas must rise uniformly preventing differential movement. The distributed monitoring ensures even results.
Monitoring Setup:
Target elevations get programmed based on pre-injection surveys. Receivers show difference from targets guiding injection. Approaching targets triggers reduced injection rates. Exact matching proves achievable consistently.
Monitoring frequency increases during active injection near targets. Operators watch displays every few seconds. Sudden changes trigger immediate response. The attention prevents over-lift accidents.
Unexpected slab responses require immediate strategy adjustments. Rapid rise indicates conditions differing from predictions. Operators modify injection approach based on observations. Flexibility proves essential for success.
Foam breakthrough through cracks shows paths to surface. Injection stops at that location immediately. Alternative holes continue treatment avoiding breakthrough areas. The adaptation prevents wasted material.
Adjustment Triggers:
Inadequate rise despite foam injection suggests unexpected dense soil. Additional material or pressure increases may help. Alternative hole locations might prove necessary. Problem-solving skills guide decisions.
Adjacent unintended movement sometimes occurs from foam spreading. Monitoring reveals these secondary effects immediately. Injection strategy adjusts preventing unwanted changes. The comprehensive tracking maintains control.
Post-injection verification confirms successful execution and results. Comprehensive documentation supports warranty and future reference. This final phase completes professional service.
Final elevation surveys measure achieved heights at all monitoring points. Comparison to baseline reveals actual lift accomplished. Target achievement confirms successful execution. Any deviations get documented explaining causes.
Tolerance specifications vary by application and agreement. Industrial facilities may require ±1/8 inch precision. Commercial applications accept ±1/4 to 1/2 inch typically. Meeting specifications proves essential for acceptance.
Verification Procedures:
Out-of-tolerance areas require evaluation and potential correction. Sometimes conditions prevent exact matching. Engineering judgment determines acceptable variations. Documentation protects all parties.
Photography documents final conditions comprehensively. Before and after comparisons show correction achieved. The visual record supplements numerical data. Professional presentation enhances credibility.
Ground-penetrating radar rescanning confirms complete void treatment. Comparison to pre-injection scans shows foam distribution. Complete filling validates thorough execution. Remaining voids indicate areas needing supplemental treatment.
Volume calculations verify adequate foam quantities were injected. Comparison to void estimates from planning confirms coverage. Significant discrepancies require investigation. The analysis ensures quality.
Quality Verification:
Final inspection examines entire project area. Patched holes should appear neat and professional. No foam residue should remain on surfaces. The finished appearance reflects contractor quality.
Comprehensive project documentation compiles all data. Elevation surveys, material quantities, and observations get organized. This record supports warranty and future maintenance. Professional contractors provide complete documentation.
Completing surface repairs maintains foundation appearance and function. Professional finishing reflects contractor quality. Proper patching prevents moisture infiltration.
High-strength polymer cement matches existing concrete color closely. Fast-setting formulas enable rapid traffic resumption. Proper material selection ensures lasting repairs. Color matching maintains aesthetic appearance.
Epoxy-based patches provide maximum strength and durability. These premium products suit high-traffic areas. The superior performance justifies additional cost. Industrial applications often specify epoxy repairs.
Patching Options:
Exterior applications require weather-resistant formulations. Freeze-thaw durability proves essential in cold climates. UV resistance prevents degradation in sunlight. Proper selection ensures long-term integrity.
Hole cleaning removes dust and loose debris before patching. Compressed air or vacuum ensures proper preparation. Clean surfaces enable good patch adhesion. This step affects long-term performance.
Bonding agent application improves patch adhesion significantly. The primer creates mechanical and chemical bonds. Following manufacturer instructions ensures effectiveness. Proper bonding prevents patch failure.
Patching Steps:
Patching material fills holes slightly overfull initially. Material settling during cure requires this excess. Troweling smooth creates flush surface. The technique ensures professional appearance.
Curing protection prevents premature loading or damage. Traffic restrictions last 1-2 hours typically. Weather protection prevents washing or freezing. Proper curing ensures lasting repairs.
Foundation foam injection follows systematic seven-step process ensuring successful stabilization. Comprehensive site assessment including GPR scanning and soil testing identifies conditions guiding all decisions. Strategic drilling creates precise injection access without excessive foundation penetration. Equipment preparation and system testing verify proper operation before starting. Controlled systematic injection with real-time laser monitoring achieves precision within 1/8 inch tolerances. Immediate verification through elevation surveys and GPR rescanning confirms complete treatment. Professional hole patching and documentation complete the service. Each step builds on previous work creating integrated process. Skipping steps or inadequate execution risks project failure. Professional floor leveling company services deliver reliable results through proven protocols. Need expert foundation repair? Contact us to discuss systematic foam injection solutions for your facility.
Explore how our expertise can benefit your project. Reach out to our team for a consultation and discover the best solutions for your needs.
At Superior PolyLift™, integrity and reliability are the core of our ethos. Our expert team crafts custom solutions that guarantee quality and durability for every project. Choose us for geotechnical excellence that endures.
Copyright © All rights reserved. 2024 • Terms of Use and Privacy Policy • Internet Marketing by Authority Solutions®